0005 Architecture School Advanced Essential Everyday Carry
The Brief:
Welcome back Ladies and Gentlemen to the Architecture Student Diaries where it is my mission to help you kill it in Architecture school whilst making you, the best you in the process. The following post is the second in my series called ‘Architecture School Essentials’, centered around essential items that will assist in making your life as a student much easier. In this second post, I will be providing the next step in essential items consisting of elements that I highly recommend you purchase, however, these items are not as crucial to purchase all at once in comparison to those in class 0004, Architecture School Essential Everyday Carry. I have curated this list with items that I believe will assist in making your studies far simpler and more efficient; and in architecture school, if you find a hack that can save time, you should take it. Except plagiarism, never plagiarise. As I stated in 0004, you do not need to have the most expensive items to be successful, great architecture comes from what you do with your tools, not how much you spent on them. Some instances of course will mean the higher the quality of the product the more reward you will gain, as a student however, most of the time you will have a perfectly acceptable outcome with the cheaper option.
The essential items I will be discussing today consists of the following:
Plan carrying tube
Brown & black paper sketchbooks
White pens
Coloured fine liners & pencils
Set Square Triangles & T Square
Drawing/ Drafting board or table
Markers
Drafters brush
Bluetooth computer mouse
External computer monitor
Miscellaneous items
Now, let’s get into it. Class is now in session.
Plan carrying tube
How to look like an architect 101: have a plan carrying tube with you at all times. The carrying tube is the statement piece of an architect aesthetically and is a dead give away as to what profession you are in. This may surprise you, but a carrying tube is not only a stylish statement piece! It in fact actually has a practical use as well! Shocking, I know. Inside your carrying tube is where you put your rolled up sheets and plans for simple and safe transportation. As architecture students, we know that printing our work costs us an absolute fortune, but unfortunately there is no way around it, you need those prints for your review and to get your mark. This means that you want to keep those pretty pages as safe as possible; a carrying tube will keep your sheets crease and rip free and protect them from water. Side not though, not all tubes are totally water proof, so don’t go throwing them in the pool and using them as a flotation device.
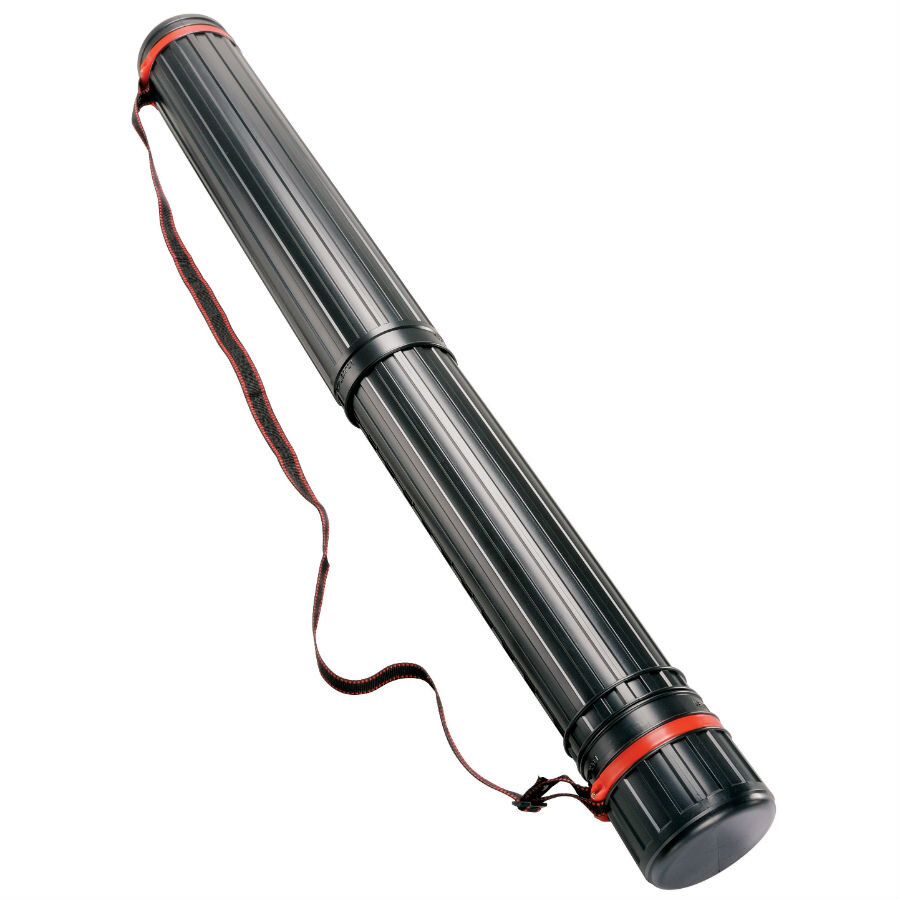
Image a: Plan Carrying Tube, Dew Drafting Supplies
Brown & black paper sketchbooks
As I stated in post 0004, I totally recommend the A5 form factor for sketchbooks for several reasons, and with brown and black paper sketchbooks it is no different. Using different coloured papers for sketching allows for your mind to perceive your work differently and create variations in your work as opposed to everything being the same. Using brown and black paper means that you need to start using different coloured pens which opens you up to a multitude of new possibilities creatively. Never underestimate the power of how beautiful a white gel pen sketch on brown paper can be. I have a friend who specialises in these types of sketches and his work always stands out from everyone else’s in the cohort. If you can create something different that catches your lecturers eye, you might just be in for a good mark. Also, sometimes it is just really nice to change things up a bit, white paper with a black fine liner can get boring when your 273 sketches into an assignment.

Image b: Kraft Paper Visual Diary, Zart Art
White pens
This section links in with the above brown and black paper sketchbooks, as white pens look incredible on both of these. I highly recommend picking up a few white pens to add to your pencil case because they just add something different to a sketch and the ink looks terrific. I am a big fan of the architect and author, Eric Reinholdt, from 30x40 Design Workshop who does some terrific sketches using this method. I do suggest that if you are looking for some sketching inspiration to check out some of his work, I will link to his Instagram below.

Image c: White Pen, Eric Reiholdt
Coloured fine liners & pencils
Whether you like it or not, becoming an architect means that you are in some ways becoming an artist also. Black and white sketches can be very beautiful and in some instances are exactly what you want, however, sometimes it is helpful to add a splash of colour. Coloured fine liners are terrific for precision work such as in detail drawings whilst coloured pencils are perfect for adding some difference to your sketches where everyone else is using markers. You can of course use a mixture of coloured pencils and markers to create some really nice effects for your work, have a play around with them together and see what you can create. You might even find your own personal sketching style in the process.

Image d: Coloured Pencils, Derwent
Set Square Triangles & T Square
It is true that in Australia, the US and many other locations that as time progresses, technical and precision drawings are becoming closer to being solely created on computer software, however, a clean hand drawing will never go out of style. Being able to present detail drawings that you have done by hand will always make the assessors impressed when everybody else did theirs on a computer. I cannot explain to you just how much easier set squares and T squares make drawing by hand. Using a ruler helps to make straight lines, but these tools assist in the directions and angles of your lines. Having correct angles with only a normal ruler is a time consuming nightmare, but these do the job for you and you will find out quickly that a drawing with angles going all over the place looks like a mess in comparison to one with correct angles.

Image e: T Square, Officeworks
Drawing/Drafting board or table
As an architecture student and in extension an architect, drafting is going to be something you do. Some people love it and some hate it, but regardless of which you are, if you have a drawings board it will be a lot easier. Now, drafting boards and tables can cost a small fortune and there are some vintage ones that are so pretty that they appear in every architects dreams from time to time. However, if you are lucky, you might be able to find one for not much money at all. Drafting boards and tables are adjustable surfaces that assist in making your drafting experience simpler and more comfortable. There are many places to buy drafting boards brand new, but for an architecture student on a tight budget, a good quality second hand board is a terrific investment. I have a friend who managed to find a decent drafting table in full working order for free on Facebook marketplace. I also once had a teacher who found a vintage table with a free drafting chair for a very low price, he then had it refurbished and the table and chair combination is now worth thousands of dollars. So keep an eye out online for a bargain!

Image f: Drafting Board, Officeworks
Markers
Want to instantly make your drawings look better and more professional? Get some alcohol based markers. It’s as simple as that. All of those incredible coloured sketches that just scream ‘I was drawn by an architect’ were most likely coloured using an alcohol based marker. These markers come in an almost endless amount of shades that can be blended together to make the most beautiful architectural drawings. The market leading brand for these markers are ‘Copic’, and a lot of the time people will refer to a marker as a Copic, similar to someone calling a facial tissue a Kleenex. Copic markers are terrific with virtually unmatched blending abilities and with refillable ink, unfortunately though, Copic’s also come with an unmatched price in the direction that a university student probably can’t afford. I will be honest, I do have some genuine Copic markers, but the majority of my markers are ‘knock off’ brands that cost less than half the price of their legitimate counterparts. These markers are not quite as good as Copics, but for your assignments, they will definitely be suitable and still add that ‘architect drawn’ quality to your work. These ‘knock off’ markers are typically available from 2 dollar shops or cheap variety stores.

Image g: Copic Markers, Iain Colliver
Drafters brush
It is inevitable from being an architect that you will draw with a grey lead and then erase and draw and erase and draw and erase on repeat for hours on end eventually leading to a desk or drawing board covered in millions of pesky erasings. You will want to get rid of these ASAP as they will accumulate and get even more annoying with time, so you will need a brush to remove them neatly. A drafters brush works as a tiny little broom for your desk which is far more handy than you would expect. These are not overly expensive which is good for students, but if you truly are on an extremely small budget, a household brush with tight bristles will do the trick and if you only have a small surface even an old toothbrush can work! The toothbrush helps for small areas in instances such as erasings being stuck in your computer keyboard

Image h: Drafting Brush, Drafting Steals
Bluetooth computer mouse
As stated previously, as an architecture student and as an architect, much of your work is going to be done on a computer and your laptops trackpad is simply not good enough for CAD software. There is no way around it, you are going to need an external mouse. Working on a mouse as opposed to a trackpad is like cutting a steak with a knife as opposed to a spoon; you will probably still get the job done with the spoon, but it is going to take ten times longer and you will probably throw the spoon across the room from frustration. I recommend a Bluetooth mouse simply for convenience as it means you do not need to need to worry about cables or tiny USB dongles that you will most likely lose. You don’t need to spend much on a mouse to get the job done, there are very cheap options that will work perfectly fine. Though, if you are willing to spend a little bit more, and I recommend you do in this instance as you will be spending countless hours holding this mouse, the current King of Bluetooth workstation mouses is the Logitech MX Master 3. I personally use the predecessor of this mouse, the MX Master 2s mouse. Many of my peers and most industry professionals also use the MX Master range of products and this is for good reason. This mouse is perfect in almost every way and if you search around, you can often find it on large discounts, I bought mine for 2/3 of RRP.

Image i: MX Master 3, Logitech
External computer monitor
In peak assessment time, it is not uncommon for me to spend 10 plus hours a day on a computer between Revit, Photoshop and InDesign, and as you might have guessed, this is not good for your eyes. You are unlikely to find a laptop screen larger than 15” typically, unless you buy the new MacBook Pro 16”; but, I am not going to get into the Mac Vs PC debate right now. There will be a future class where I will compare Microsoft and Mac computers for architecture, however. If you buy a gaming laptop you may be able to find a 17” screen, I have a few friends with 17” laptops and the weight and size makes life very difficult for them at times, so I don’t entirely recommend this. This means that you will be staring at some very small elements on a screen for several hours at a time, if you have a larger external monitor to use when at home it will do wonders for not only your eyes but also your productivity. You can pick up a decent sized monitor that will connect directly into your laptop, mirroring your screen and making everything much bigger; thus making you have to squint much less. Having a larger screen not only means that things are bigger, but it also gives you more screen real estate which allows you to see more on your screen or have more windows open and visible at once leading to a far more productive work space. I recommend an external monitor as one of your very first architecture school purchases, you will thank me for it soon enough.

Image j: LG Monitor, LG Australia
Miscellaneous items
This is the part where I talk about the things that aren’t important enough to get their own section but are still integral items for architecture students. The items I am about to list are probably items that you will have around the house, but if you don’t, I would recommend going out and getting them now as they will come in very handy one day soon. These items include: masking tape, duct tape and double sided tape for holdings things together in instances like making a model and last but not least, a glue stick. You probably thought you might have outgrown glue sticks in year 4, but no, they come in very handy in university too! An example of where masking tape came in handy was in one of my assessments where I had to make a model out of wooden blocks, these were high quality blocks though and cost a lot of money so I didn’t want to waste them on one model, so I got around this by putting them all together with a hidden layer of tape instead of glue which allowed me to take it apart straight after my review. The examiner had no idea and I got a HD… There’s nothing wrong with thinking smart and being money wise, people.

Image k: Masking Tape, 3M
Final Notes:
I hope that my Architecture School Essentials series are helping you in your studies and making your student life just that little bit easier. That is what I’m here for after all! Still to come in the series are posts regarding general university student EDC, the best locations to buy your essentials and a special post on Blue light Glasses! Stay tuned for more helpful tips and tricks to make your life easier in architecture school.
Ladies and Gentlemen, class dismissed.
Iain Colliver, SONA, YBA, GKIHS

References:
Plan Carrying Tube: https://www.draftingsuppliesdew.com/alvin-btr4-black-knight-storage-tube
Craft Paper Visual Diary: https://www.zartart.com.au/product/PD035
Coloured Pencils: https://www.derwentart.com/en-au/p/r32196/professional/colouring/studio-pencils/studio-pencils-12-tin
T Square: https://www.officeworks.com.au/shop/officeworks/p/studymate-60cm-plastic-t-square-sm0102583
Drawing Board: https://www.officeworks.com.au/shop/officeworks/p/kent-studio-drawing-board-ke0382161
White Pens: https://www.instagram.com/p/BmGVaIdBca6/
Drafting Brush: https://www.draftingsteals.com/20478.html
MX Master 3: https://www.logitech.com/en-au/product/mx-master-3
LG Monitor: https://www.lg.com/au/uhd-4k-monitors
30x40 Instagram: https://www.instagram.com/30by40/?hl=en